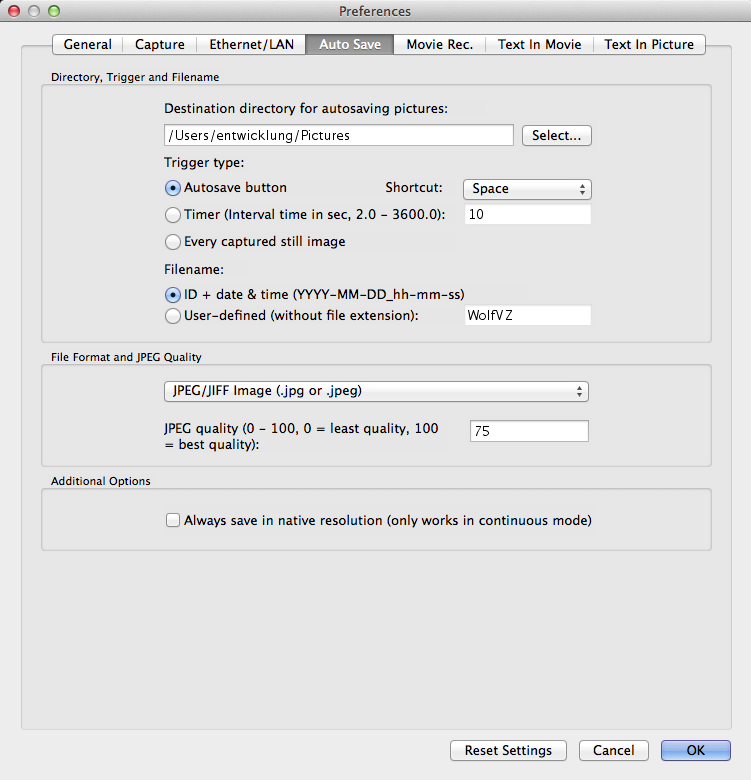
On this tab you can define the preferred destination directory for saving pictures, change preferred file format, compression rate (JPEG), change file name and Trigger event for the Auto Save function.
With the "Auto Save" function pictures can be saved without entering any information. All necessary information is provided on this tab.
To recall the default settings for this dialog tab, click "Reset settings". The other tabs of the "Preferences" dialog box will not be affected.
Click the "Select" button to change the destination directory for auto saving pictures with the "Autosave Picture / Start Autosave Picture" menu item.
Define which event pictures will be saved by the auto save function. Possible triggers are:
Autosave button: You can select a key on the keyboard which will trigger the auto save process. This trigger is used for saving pictures very quickly while doing a presentation.
Timer: After you've started the auto save process the application will save a picture every time the specified time interval has passed. This trigger is often used to create a log of a presentation without doing anything except starting the process at the beginning.
Save every captured still image: Every picture which is captured in still image mode will get saved. This trigger is used for application where a snapshot of the actual Visualizer picture should be taken.
Define the file name for auto saved pictures. The file name can be a combination of model name, firmware version, serial number and date and time or can be user-defined (i.e. "WolfVZ"). The user-defined file name will have a sequence number at the end to create a unique file name.
Select the desired picture file format for auto saved pictures and define the JPEG quality level if the JPEG format is selected. Picture formats can be divided into three categories: Lossy compression formats, lossless compression formats and uncompressed formats.
Uncompressed formats take up the most amount of data but they are exact representations of the picture.
Lossy compression formats are generally suited for photographs but not for illustrations, drawings and text as compression artifacts from the picture will be visible. Lossy compression, as its name implies, does not encode all the information of the picture so when it is decompressed for display it will not be an exact representation of the original. Lossy compression algorithms take advantage of the inherent limitations of the human eye and discard invisible information. Most lossy compression algorithms allow for variable quality level (compression) and as this level is increased, file size is reduced. At the highest compression level, picture deterioration becomes noticeable as "compression artifacting". However it is able to compress picture files very effectively compared to lossless formats, as it discards certain information. A prime example of a lossy compression format is JPEG (Pictures that have lots of complexity in them with similar colors throughout are good for this format).
Lossless compression formats are suited for illustrations, drawings, text and other material that would not look good when compressed with lossy compression. As the name implies, lossless compression will encode all the information from the original, so when the picture is decompressed, it will be an exact representation of the original. Because there is no loss of information in lossless compression, the achievable compression level is normally lower than with lossy compression. Examples of lossless picture compression are PNG and GIF. GIF supports only 256 colors (8 bits per pixel). PNG supports a wider range of formats from 8 bits per pixel to 24 bits per pixel. PNG is the mostly used today due to its flexibility and compression.
The use of a certain picture compression depends on what should be compressed.
BMP The BMP file format (Windows bitmap) handles graphics files within the Microsoft Windows OS. Typically, BMP files are uncompressed, hence they are large; the advantage is their simplicity, wide acceptance and use in Windows programs.
JPEG JPEG (Joint Photographic Experts Group) files are (in most cases) a lossy format; the DOS filename extension is JPG (other OS might use JPEG). Nearly every digital camera can save pictures in the JPEG format, which supports 8 bits per color (red, green, blue) for a 24-bit total, producing relatively small files. If the compression level is not set too high, it does not noticeably detract from the picture's quality, but JPEG files suffer generational degradation when repeatedly edited and saved. Photographic pictures may be better stored in a lossless format if they will be re-edited, or if small "artifacts" (blemishes caused by the JPEG's compression algorithm) are unacceptable. The JPEG format also is used as the picture compression algorithm in many Adobe PDF files.
GIF GIF (Graphics Interchange Format) is limited to an 8-bit palette, or 256 colors. This makes the GIF format suitable for storing graphics with relatively few colors such as simple diagrams, shapes, logos and cartoon style pictures. The GIF format supports animation and is still widely used to provide picture animation effects. It also uses a lossless compression that is more effective when large areas have a single color, and ineffective for detailed pictures or dithered pictures.
PNG The PNG (Portable Network Graphics) file format was created as the free, open-source successor to the GIF. The PNG file format supports truecolor (16 million colours) while GIF only supports 256 colors. The PNG file excels when the picture has large, uniformly colored areas. The lossless PNG format is best suited for editing pictures and the lossy formats, like JPG, are best for the final distribution of photographic pictures, because JPG files are smaller than PNG files. Many older browsers currently do not support the PNG file format, however, with Internet Explorer 7, all contemporary web browsers fully support the PNG format. The Adam7-interlacing allows an early preview, even when only a small percentage of the picture data has been transmitted.
TIFF The TIFF (Tagged Image File Format) is a flexible format that normally saves 8 bits or 16 bits per color (red, green, blue) for 24-bit and 48-bit totals, respectively, using either the TIFF or the TIF file extensions. The TIFF's flexibility is both a blessing and a curse, because no single reader reads every type of TIFF file. TIFF's are lossy and lossless; some offer relatively good lossless compression for bi-level (black&white) images. Some digital cameras can save in TIFF format, using the LZW compression algorithm for lossless storage. TIFF is not widely supported by web browsers. TIFF remains widely accepted as a photograph file standard in the printing business. TIFF can handle device-specific colour spaces, such as the CMYK defined by a particular set of printing press inks.
The following list is a brief summary for the available picture formats when using them within a web page/application.
BMP shouldn't be used online within web pages - wastes bandwidth
JPG is great for photos
GIF is good for illustrations and line-art when you do not wish to move to PNG
PNG is great for illustrations and photos. PNG is a fair replacement for GIF and JPG and has the best support for transparency.
Input the desired compression rate.
Selecting the check box "Always save in native resolution" only works in conjunction with the "Continuous View mode". Regardless of the selected picture resolution for capturing pictures from a Visualizer, the application will always save a native resolution picture if auto save is executed. This is done in order to always save pictures in the best possible resolution. To get a native resolution Visualizer picture the Continuous mode will be stopped, a single native resolution picture is captured and saved and the Continuous mode is restarted.